Eliza Wright
![]() Hints and Tips
Hints and Tips
![]() Silk Shading
Silk Shading
![]() Getting Started
Getting Started
Before you start you will need a suitable design. Although I am taking you through the working of Pinnacle Ridge, this is quite a complicated landscape. If you’ve never done silk shading before, I strongly suggest that you start by practising the technique first. If you decide to jump in at the deep end and begin with a landscape design (which I have to admit is what I did!) then I strongly advise you to start small. By small, I mean a design whose dimensions are no more that 2 or 3 inches (5 or 7.5 cm). This means you will not be faced with a ‘practice’ project that takes weeks or months to complete, yet you'll still be able to practice the various kinds of stitches and effects and, hopefully, produce a lovely piece of work into the bargain.
1. A square piece of white Habotai silk, size depending on the design.
2. A piece of white cotton of a similar size that will be the backing fabric.
3. Size 10 embroidery needles.
4. Small sharp scissors.
5. Stranded Cotton.
6. Fine white ‘machine’ cotton or polycotton.
7. A round or square wooden embroidery hoop that will fit your fabric and leave plenty of space around your design, plus a small screwdriver to tighten the screw.
8. To produce the design itself you may need any or all of: paper, drawing equipment, water colours, a very fine painting brush, masking tape.
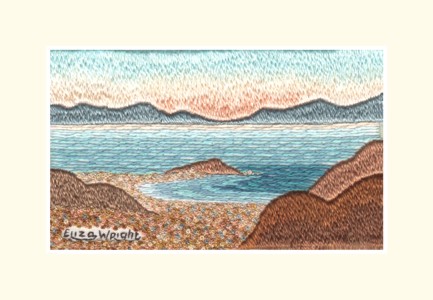
If you don't already have any water colours, I find that I almost always use a mauve or violet shade, so to start that's all you will need. If you can get to an art shop, buy a violet water colour pencil, and a very fine brush. The brush I use is a very fine miniaturist’s water colour brush made from sable. The beauty of these little brushes is that although they have a very fine point they also hold a fair amount of paint. This means that you do not have to keep stopping to load the brush and starting again, which is not only a pain but can leave a rather ragged line.The landscape you draw for your first design should be simple. It doesn’t need to be an actual place. It should include sky, hills or islands perhaps, flat water (by which I mean sea or a loch – not a river), and some sort of foreground interest such as a beach or rocks. Do not include any details in your line drawing, just stick to the basic shapes. Ensure that your water is flat and that the water line is level. Draw the boundary lines of your design as well, as a square or rectangle around it. Make sure these lines are straight and the corners square. Go over the lines so that they stand out clearly, say with a fine black felt tipped pen.
Below is an example of a typical, simple silk shading landscape that would be relatively easy to stitch. The actual size of this embroidery is 5 cm (2") by 7.5 cm (3"). If you would like to copy this design for your own first attempt, please feel free to do so.
There are several ways to do it, but this is the one I use.
First tape the line drawing to a table or drawing board with masking tape to stop it moving about. Then put the piece of silk over the top of it. You should be able to see the lines of the drawing clearly through the silk. Move the silk until the design is about central.
Take great care that the grain of the silk is parallel to the boundary lines on your drawing. This is important. If you have trouble doing this, then try pulling a thread from a part of the silk which is out side the design area. Pull the thread right out. This will give you a visible line on the silk to work with. When you are satisfied, tape the silk down with a piece of masking tape at each corner, putting a little tension on the fabric so that it lies perfectly smooth.
The next bit can be tricky, as what I do is I paint over the design lines with watercolour paint. The key is to practice on a scrap of fabric or the waste fabric around the design so that you get the consistency of the paint right. I usually use a violet shade and dilute the paint until it is has the correct intensity. You want it dark enough to be clear but not too dark. You need the right amount of water as well. As you can imagine if it’s too wet you will get a blob not a line as it will soak into the fabric. Try to paint a smooth, clean line over all the lines of the design including the borders. Leave it to dry before moving the silk carefully and checking you have painted over all the lines.
This next part is optional, but I always do it. I hem the edges of the silk and the cotton backing by hand. Otherwise they will fray, and fine silk fibres enmeshed in your embroidery can be quite difficult to extract!
If this is a new experience for you, here are a few guidelines:
(a) Separate the two rings and adjust the screw so that the outer ring will fit over the inner quite easily.
(b) Lay the silk and cotton squares centrally over the inner ring, silk on the top and square with each other.
(c) Put the outer ring on top, with the brass screw top centre, and press it down over the inner ring.
(d) The fabric should now be caught between the two rings and possibly already looking pretty flat and tight. If the whole thing seems loose and the fabric can move about a lot, tighten up the screw with your fingers until the fabric is caught, but you can still move it.
(e) Work your way around the hoop, pulling the fabric evenly tight with your fingers. Check that the design is 'square' and still central.
(f) Turn the hoop over and check on the backing fabric. Sometimes it will get 'left behind' and there will be bulges or tucks. Pull all these flat, all the time checking that the grain of the fabric is square.
(g) When you're sure it's as good as it can be, tighten up the screw a bit.
(h) Repeat (e),(f) and (g) until you can't get the screw any tighter, even with the screwdriver.
(i) Tap the surface of the silk with your fingertip. It should feel and sound like you're tapping a drum.
Some people recommend that after every stitching session you should release the embroidery from the hoop, so it's not under too much strain. I can see their point, but have to admit I don't do this, and so far have not had any problems. In one case, due to illness, a piece of embroidery was overlooked and stayed stretched like that for two years before I could finish it!
This is another of those tasks that may seem tiresome at the time! You may think it isn't necessary, especially if you intend to leave the fabric stretched in the hoop until the embroidery is finished. Personally I think the more you can do to prevent the two pieces of fabric slipping in relation to one another, the better. Catch them while they're just about perfect and make sure they can't move!
There are two types of stay-stitching, one on the design itself and the rest outside the design.
(a) For the stitches inside the design area I use the finest white machine thread I can find. The stitches should be very small, with about 1 cm or more between them. Run these just below the lines of the design, and just inside the boundary lines. If you go along the lines it makes the embroidery more difficult.
(b) Outside the design area I use ordinary cotton or polyester thread, and a simple running stitch. When you come to detach your embroidery from the frame, you'll find mounting it a whole lot easier if the two pieces of fabric don't flap about.
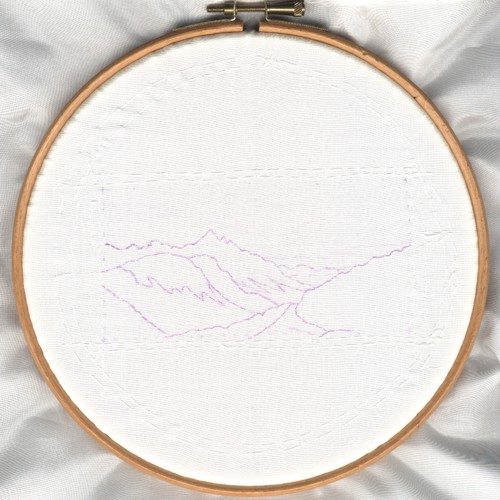
Below is a picture of Pinnacle Ridge at the end of this stage in the proceedings. The design is about 6.25 cm (2.5") x 12.5 cm (5.0"). The fabrics are about 30cm (12.0") square and I used a 20 cm (8.0") hoop. Note the two rows of stitching round the edges of the design and also round the inside of the hoop. The stay stitches inside the design area are too small to see.
That is, providing you know how to do the basic stitches used in silk shading - long and short stitch, and split stitch. Split stitch is used to outline things, as when you stitch over it, it emphasises the edge of anything that's stitched in silk shading. If you were stitching a flower, you would do a line of split stitch around the edge of each petal, then embroider the long and short stitch over it. This gives a slightly raised edge. I also use French knots quite a lot for foreground detail.
Because there are so many places already where you can learn these basic stitches, I'm going to assume you already know, or can easily find out, how they are done.
See Also: Eliza Wright homepage | How to do Silk Shading | Mixed Media Gallery | Silk Shading Gallery | For Sale Gallery
Copyright © 1998-2012 Eliza Wright, Isle of Skye , Cross Stitch Designs